3D printing has revolutionized the way prototypes are created, offering unprecedented speed and flexibility in design. This technology allows engineers and designers to transform their ideas into tangible objects quickly, facilitating rapid iteration and innovation. As industries increasingly adopt 3D printing, understanding its applications in prototyping becomes essential for staying competitive.
In this guide, readers will explore the fundamentals of 3D printing for prototyping, including material selection, design considerations, and best practices. We will delve into various techniques and technologies that enhance the prototyping process, ensuring that you can make informed decisions for your projects.
Additionally, the guide will cover real-world case studies that illustrate the successful implementation of 3D printing in prototyping across different sectors. By the end, you will have a comprehensive understanding of how to leverage 3D printing to streamline your prototyping efforts and bring your ideas to life efficiently.
Step-by-Step Guide to 3D Printing Rapid Prototypes
If you’ve ever faced the hurdles of turning a concept into a concrete prototype, you know the process can be as daunting as it is exciting. The path from a digital design to a physical product is fraught with setbacks: from slow production to high costs to prototypes that fall short of expectations. In this guide, we’ll walk you through the transformative power of 3D printing technologies—step by strategic step. We’re talking about faster turnaround times, meticulous detail, unparalleled design freedom, and prototypes that truly embody your vision.
Understanding 3D Printing for Rapid Prototyping
3D printing, also known as additive manufacturing, allows designers to create physical models quickly using 3D CAD data. This technology has revolutionized the prototyping process, enabling rapid iterations and reducing time-to-market. Companies like Protolabs and Stratasys have pioneered this field, offering various services tailored to meet diverse prototyping needs.
Technical Features of 3D Printing
The technical features of 3D printing vary based on the technology used. Below is a comparison of some key features across different 3D printing methods:
| Feature | FDM (Fused Deposition Modeling) | SLA (Stereolithography) | SLS (Selective Laser Sintering) | MJF (Multi Jet Fusion) |
|---|---|---|---|---|
| Material Types | Thermoplastics (e.g., ABS, PLA) | Photopolymers | Nylon, Polymers | Nylon, Polymers |
| Layer Thickness | 0.1 – 0.3 mm | 0.025 – 0.1 mm | 0.1 – 0.2 mm | 0.1 – 0.2 mm |
| Build Volume | Large (up to 1m³) | Moderate (up to 500mm) | Large (up to 1m³) | Large (up to 1m³) |
| Speed | Moderate | Fast | Moderate | Fast |
| Surface Finish | Moderate | Excellent | Good | Good |
| Cost | Low to Moderate | Moderate to High | Moderate to High | Moderate to High |
Types of 3D Printing Technologies
Different 3D printing technologies cater to various applications and requirements. Here’s a comparison of some popular types:
| Technology | Best For | Advantages | Disadvantages |
|---|---|---|---|
| FDM | Prototyping, Functional Parts | Cost-effective, easy to use | Limited detail, slower speed |
| SLA | High-detail prototypes | Excellent surface finish | Higher material costs, post-processing required |
| SLS | Functional prototypes, Small runs | Strong parts, no support structures | Higher costs, limited material options |
| MJF | Production parts, Complex designs | Fast production, good detail | Higher initial costs, limited materials |
The 3D Printing Process
Step 1: Digital Design and CAD Modeling
Every 3D-printed object starts with CAD software where you can create detailed 3D models. Tools like GrabCAD simplify the transition from design to print, ensuring every tolerance and support structure is perfect for 3D printing.
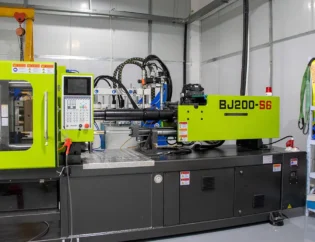
Step 2: Preparing the 3D Printer
Selecting the appropriate 3D printing technology and material is crucial. Whether it’s the robust FDM for strong, durable parts or the versatile SLA for models requiring fine detail, printers must be calibrated for excellence.
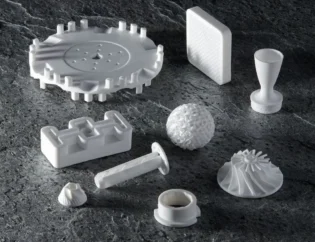
Step 3: Printing the Prototype
The CAD model is processed by slicing software, which translates it into a language the printer can understand. Adjust print settings such as layer height and infill density for your specific needs, then watch as your printer turns your vision into a tangible prototype.
Step 4: Post-Processing and Finishing
Once printed, it’s time for some elbow grease. Removing supports, sanding rough edges, and applying finishing touches are all part of this stage. Advanced technologies like SLA minimize post-processing time, ensuring your prototype looks and feels as intended.
Step 5: Testing and Evaluation
Prototypes are meant to be tested. This stage is crucial for evaluating your design’s functionality and gathering valuable feedback for further iterations. Testing for color, form, fit, and function enables greater collaboration and communication.
Step 6: Refinement and Optimization
Taking feedback into account, refine and optimize your design. This may involve several rounds of tweaking and reprinting until everything is just right. The precision of modern printers means you can refine with confidence, achieving the desired outcome with minimal waste.
Conclusion
3D printing has transformed the prototyping landscape, offering unparalleled speed, efficiency, and design freedom. Companies like Protolabs, Hubs, Snapmaker, and Stratasys are at the forefront of this revolution, providing innovative solutions for rapid prototyping. By integrating 3D printing into your development process, you can significantly accelerate the creation and refinement of new products, unlocking greater creativity and market potential.
FAQs
1. What is the cost of 3D printing?
The cost of 3D printing varies based on the technology, materials used, and complexity of the design. FDM is generally the most cost-effective, while SLA and SLS can be more expensive due to material costs.
2. How do I choose the right 3D printing technology?
Choosing the right technology depends on your specific needs, such as the required detail, material properties, and production speed. FDM is great for functional prototypes, while SLA is ideal for high-detail models.
3. What file formats are needed for 3D printing?
Common file formats for 3D printing include STL, OBJ, and AMF. These formats contain the necessary data for the printer to create the model.
4. How large of a part can you 3D print?
The maximum size of a 3D printed part depends on the printer’s build volume. Most industrial printers can handle parts up to 1m³, while smaller desktop printers may have limited capacities.
5. What are the advantages of 3D printing?
3D printing offers numerous advantages, including faster production times, reduced costs for small quantities, design freedom, and the ability to create complex geometries that traditional methods cannot achieve.